Warning! The brake pads must be replaced on both front/rear brakes at the same time. Remember that the dust produced during the operation of the brake mechanisms may contain asbestos, which is extremely harmful to human health. Never blow off dust with compressed air or inhale it; when servicing mechanisms, wear a protective mask or respirator. Never use gasoline or petroleum-based solvents to clean brake system components, use only branded cleaners or methyl alcohol!
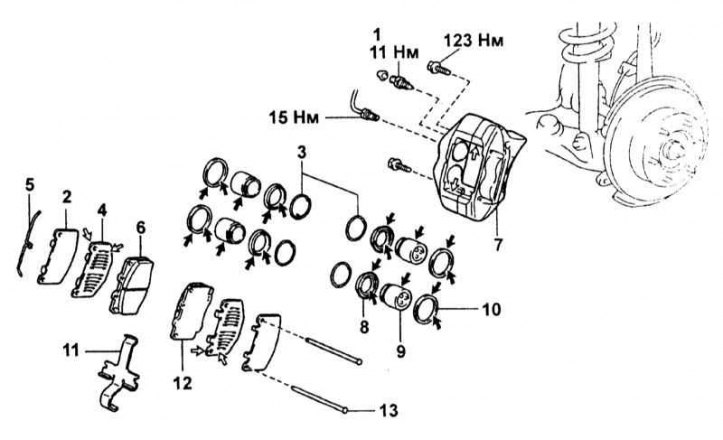
Installation details of the front brake pads and caliper

1 - bleed valve; 2 - External anti-squeal lining; 3 - Retaining rings; 4 - Internal anti-squeal lining; 5 - Spring retainer; 6 - Internal brake shoe; 7 - Brake caliper; 8 - Bellow; 9 - Piston; 10 - Piston cuff; 11 - Anti-squeal spring; 12 - External brake shoe; 13 - Guide pin
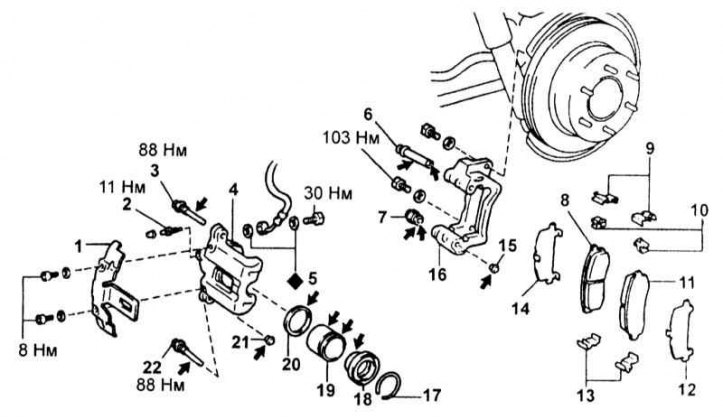
Details of installation of rear brake pads and caliper

1 - Dirt shield; 2 - bleed valve; 3 - Main guide pin; 4 - Brake caliper; 5 - Gasket; 6 - Bushing of the main guide pin; 7 - Auxiliary guide pin bushing; 8, 11 - Brake shoe; 9, 13 - Retaining plate insert; 10 - Wear indicator; 12, 14 - Anti-squeal pad; 15, 21 - Plug; 16 - Caliper bracket; 17 - Retaining ring; 18 - Anther; 19 - Piston; 10 - Piston cuff; 11 - Anti-squeal spring; 22 - Auxiliary guide pin
1. Details of installing brake pads are shown in the illustrations above. Loosen the front wheel nuts. Jack up the front of the car and place it on jack stands. Set the parking brake/chock the wheels on the ground. Remove wheels.
2. Remove spring clip, drive pins, anti-squeal spring, pads, and anti-scream pads.
3. After removing the pad, carefully inspect the inner surfaces of the caliper for signs of the development of brake fluid leaks, check the condition of the piston boot. Defective components must be replaced (see Section Removal and installation of brake calipers). Do not forget to also carefully examine the condition of the brake disc (see Section Check of a condition, removal and installation of a brake disk), if necessary, give it to the groove.

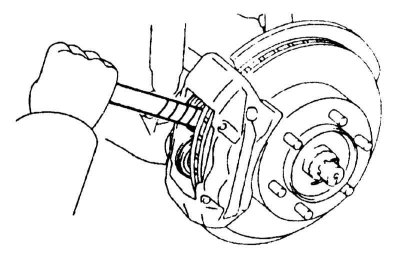
4. Pump out some brake fluid from the GTZ reservoir and press the pistons into the cylinders with a hammer or pry bar (refer to accompanying illustration).
Note. The mount should be wrapped with electrical tape. Replace each caliper in turn. To facilitate piston movement, loosen the bleeder screw and move the pistons if there is a slight leakage of brake fluid.
5. Install new anti-squeal pads on new pads and install two pads.
Note. Apply disc brake grease to both sides of the inner anti-squeal pads. Grease must not get on the working surface of the pads or disc.
6. Install anti-squeal spring, drive pins and spring retainer.
7. When you have finished servicing both brakes, reinstall the wheels, lower the vehicle to the ground and tighten the wheel nuts to the required torque (see chapter Vehicle settings and routine maintenance).
8. Check the brake fluid level in the GTZ reservoir, correct if necessary (see chapter Vehicle settings and routine maintenance). Swing the foot brake pedal a few times to seat the pads on the discs, then recheck the fluid level.
9. Before starting the operation of the car, make sure that the brake system is functioning properly.
