
Examination
1. Disconnect the ground wire from the battery, and then the positive wire.
2. Check the battery charging status. Visually inspect the indicator on the top of the battery. If the indicator is black, charge the battery as described in chapter 1. Then use a digital voltmeter to test the battery voltage with an open circuit (pic. 3.2).
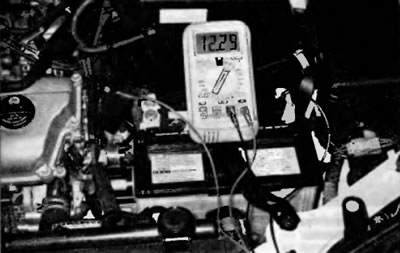
Pic. 3.2. Touch the black probe of the voltmeter to the negative terminal, and the red probe to the positive terminal of the battery. A fully charged battery should show voltage in the range of 12.5...12.9 V
Note. Before making accurate voltage measurements, the surface charge of the battery must be removed. Turn on the high beam headlights for 10 seconds and then turn it off. Wait two minutes.
With the engine off and all consumers of electricity, touch the negative probe of the voltmeter to the negative terminal of the battery, and with the positive probe to the positive terminal of the battery. The battery voltage should be approximately in the range of 12.5-12.9 V, depending on the state of charge and the outside temperature. If the battery voltage is less than normal, charge the battery before proceeding to the next test. Do not perform a load test on batteries if their charge is not correct.
3. Perform a load test on the battery. An accurate check of the battery condition can only be performed using a special load tester (available at most auto parts stores). This test evaluates the battery's ability to activate the starter and other electrical consumers during periods of high load (current strength). Connect a special battery tester under load to the battery terminals (pic. 3.3). Test the battery under load according to the specific instrument manufacturer's instructions. In this device to increase the load (current strength), placed on the battery uses a carbon cell. Apply a load to the battery for 15 seconds or less and watch that the battery voltage does not drop below 9.6V.
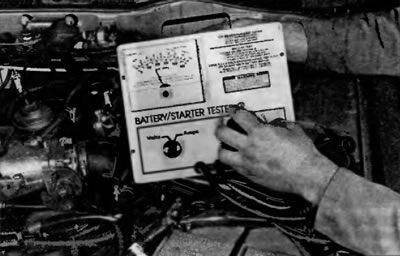
Pic. 3.3. Some battery load testers are equipped with an ammeter that allows you to adjust the load on the battery (shown). Cheaper testers only have a load switch and a voltmeter
Note. Low temperature leads to a slight decrease in the minimum voltage readings. To compensate for the effects of cold climates, refer to the manufacturer's instructions. Minimum voltage under load for temperatures below freezing (0°C) should be approximately 9.1 V.
Replacement
4. Disconnect the ground wire from the battery, and then the positive wire (pic. 3.4).
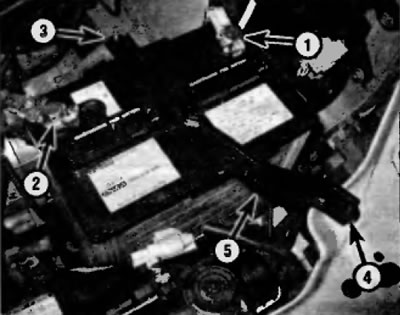
Pic. 3.4. Disconnect the ground wire from the negative terminal to remove the battery (1) battery, disconnect the wire from the positive terminal (2), then loosen the nut (3), remove the bolt (4) and remove the retaining clip (5)
5. Remove the battery retaining clip (pic. 3.4).
6. Lift and remove the battery. Be careful, it's quite heavy.
Application. Many auto parts stores sell battery straps and handles at a reasonable price. They make it easy to remove and carry the battery.
7. While the battery is removed, remove the battery tray (pic. 3.7) and inspect it for signs of corrosion.

Ryas. 3.7. To detach the plastic battery shelf from the top bracket below, simply pull the two dowel pins out of the mating holes in the bracket
8. If the battery shelf shows signs of corrosion, wash it thoroughly with clean water. If the shelf is split or damaged, replace it. When installing the shelf, insert the two dowel pins into the matching holes in the appropriate support bracket and make sure they are seated correctly.
9. If you are replacing a battery, make sure that the new battery is identical in size, capacity, cold cranking current, etc.
10. Installation is carried out in the reverse order of removal.