General information
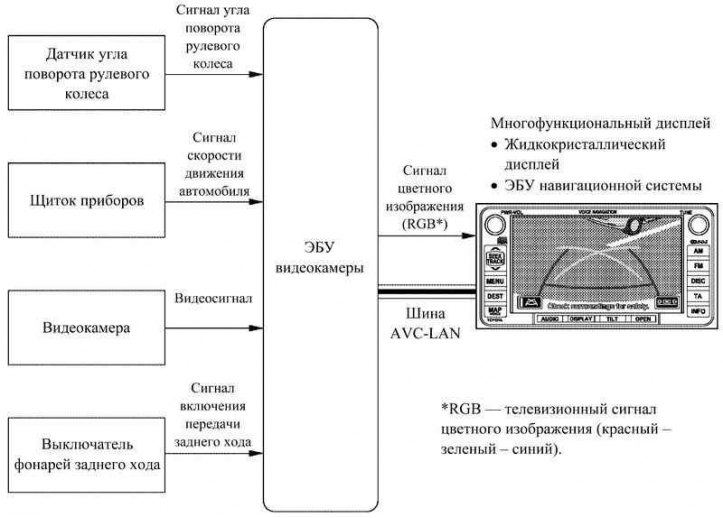
Pic. 1.16. Rear View Monitor System Block Diagram
As with the previous model, the rear view monitor is optional on new vehicles with a multifunction display.
On the new car, the location of the video camera ECU and some other components has been changed. In addition, the touch panel display has been redesigned to improve visibility.
Design features
The camera ECU controls the system by processing information from the following sources: steering angle sensor signal, vehicle position signal from the navigation ECU, vehicle speed signal, and engine start sensor signal in neutral.
Table 1.6. Purpose of the main components
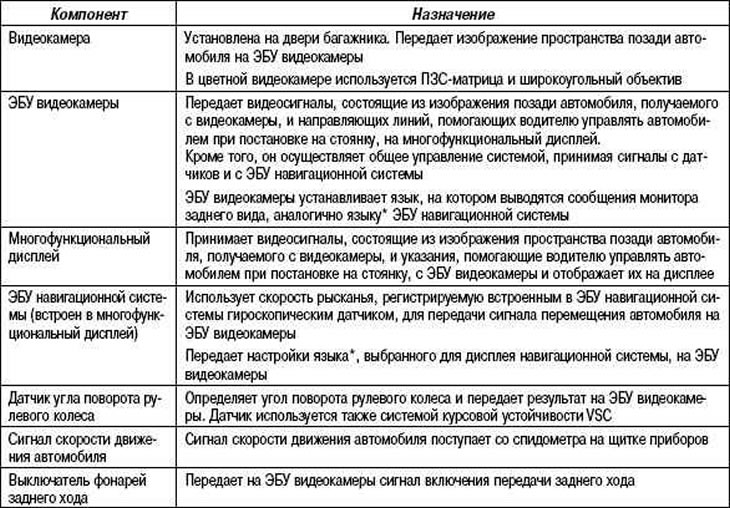
* Choose from 8 languages for display text and voice commands (English, Danish, Dutch, French, German, Italian, Spanish and Swedish).
Area shown on the display
On the multifunction display, objects located on the right side of the vehicle are displayed on the right side of the display, and objects located on the left side of the vehicle are displayed on the left side of the display.
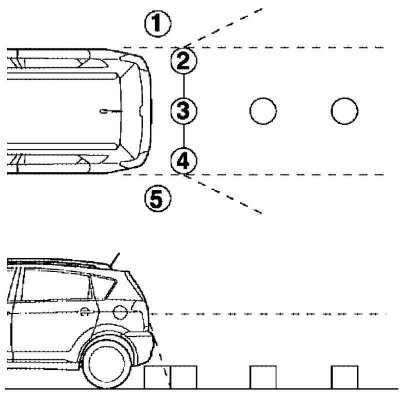
Pic. 1.17. Area displayed on the display
The camcorder uses a wide-angle lens. The distances to objects perceived by the screen differ from the actual distances (pic. 1.17).
Note. The size of the area displayed on the screen may vary depending on the condition of the vehicle and road conditions.
The field of view of the video camera is limited. The image coming from the video camera does not show objects located at the edges of the bumper and under the bumper.
Description of the display image
The system displays the image in two modes: the passive assistance mode, which helps when the car enters the garage or open parking area, and the parking in line mode, prompting the driver the angle and moment of turning the steering wheel.
Switching modes is carried out using a touch switch, the display is factory set to park in a row. When the engine is turned off, the selected mode is stored in the ECU memory. The next time the engine is started, the mode stored in the ECU memory is restored.
Passive Assistance Mode
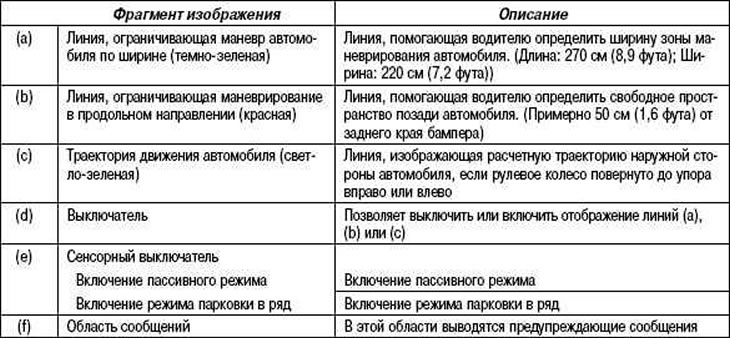
When the system is in passive assistance mode, the screen displays fixed lines and an image of the rear of the vehicle (see below). You can navigate along these lines when reversing.
In this mode, you can press the switch «On». («ON») / «Off». («OFF»), to erase all lines.
Table 1.7. Description of the passive assistance mode
Row parking mode
In this mode, used to park the car in a row, the ECU switches the display of lines according to the maneuvers of the car. This provides the driver with information about the angle and the moment the steering wheel is turned when parking in a row.
In the lane parking mode, you can press the mode switch to select one of the two.
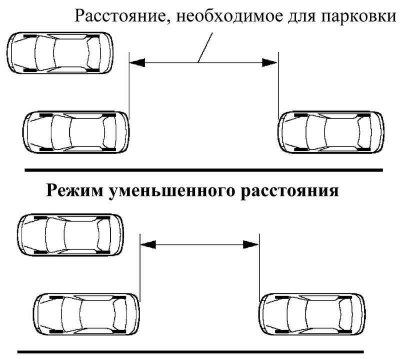
Pic. 1.18. Row parking pattern
Two display modes provided: standard mode and reduced distance mode. Reduced distance mode is for situations where there are fewer parking spaces than usual. At the factory, the system is set to standard mode. When the engine is turned off, the selected mode is stored in the ECU memory. The next time the engine is started, the mode stored in the ECU memory is restored (pic. 1.18).
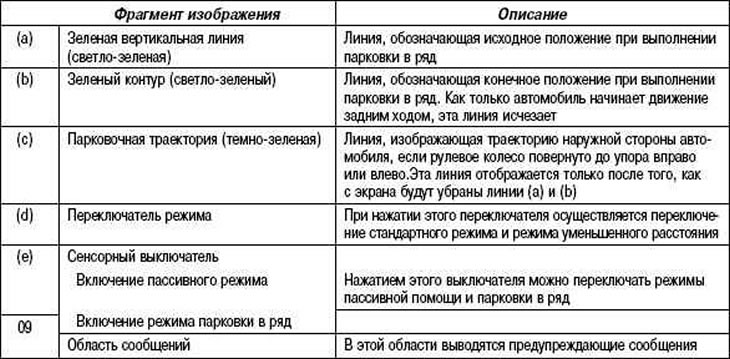
Table 1.8. Description of the parking mode in a row
Warning message
A warning message is displayed at the bottom or middle of the screen under the following circumstances, regardless of whether the system is in passive assist mode or in lane parking mode. The message is displayed in the same language as the one selected for the navigation system display (English, Danish, Dutch, French, German, Italian, Spanish and Swedish).
Table 1.9. Messages displayed at the bottom of the screen

Table 1.10. Messages displayed in the middle of the screen

System operation
The following are examples of how the system works in passive assistance mode and in lane parking mode.
Attention! Do not rely entirely on the rear view monitor. When reversing, you should be careful, just like on a car without a rear-view camera.
Warning! Do not reverse while looking only at the screen. The image on the screen may differ from the actual situation. Reversing using only the screen may cause the vehicle to collide with an object or cause an accident. Before you start reversing, you should carefully inspect the area behind and around the car.
Passive Assistance Mode
To use the passive assistance mode when parking the car, as shown in Figures 1.19–21, follow the steps below.
Engage reverse gear.
Make sure passive assistance mode is enabled.
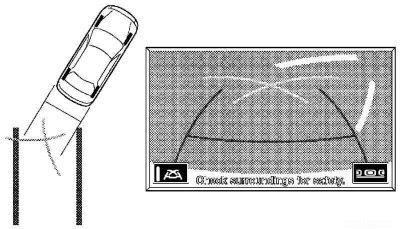
Pic. 1.19. Scheme of the beginning of movement in passive assistance mode
The image shown in Figure 1.19 will be displayed on the screen.
Start reversing and stop at the point where the parking line intersects with the left side of the intended parking position.
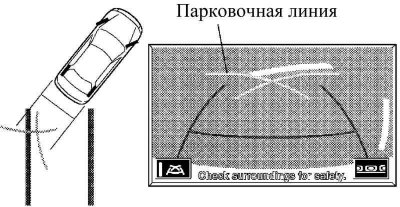
Pic. 1.20. The scheme of movement in the passive assistance mode according to the instructions of the parking line
Turn the steering wheel all the way to the right and drive in reverse (pic. 1.20).
Continue driving in reverse until the vehicle turns parallel to the lines shown.
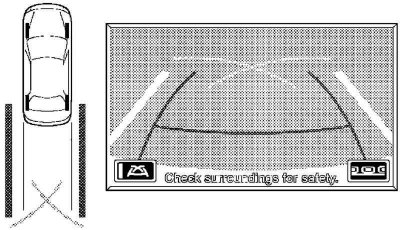
Pic. 1.21. Parking position of the car
After the vehicle is parallel to the lines, set the steering wheel straight and reverse until the vehicle is parked (pic. 1.21).
Row parking mode
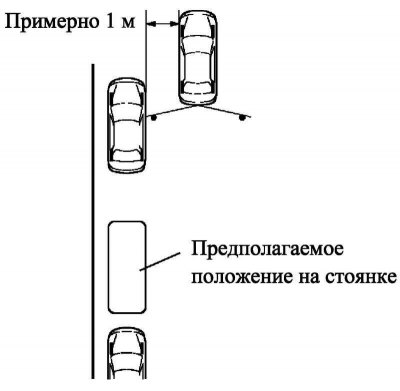
Pic. 1.22. Parking a car
To use the parking mode in a row when placing the car in the parking lot, as shown in Figure 1.22, you should perform the following steps.
Stop the vehicle parallel to the edge of the road or a curb so that the distance from the side of the parked vehicle is about 1 m, about half a length ahead of the parked vehicle.
Set the steering wheel straight and engage reverse gear.
Make sure lane parking is enabled.
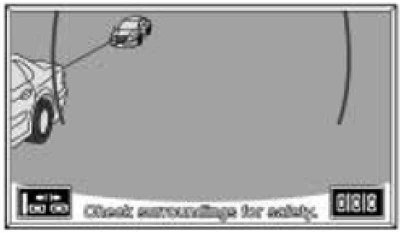
Pic. 1.23. Image on the display screen during side-by-side parking mode
The image shown in Figure 1.23 will be displayed on the screen.
Press the mode switch to select standard mode or reduced distance mode.
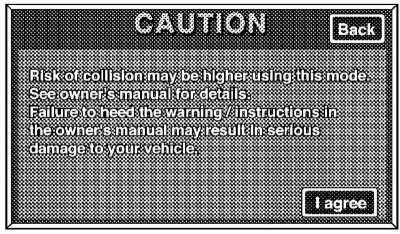
Pic. 1.24. Message displayed on the display screen during reduced distance mode
If the reduced distance mode is selected, the message shown in Figure 1.24 will be displayed on the screen. If you accept this message, the display will switch to reduced width mode.
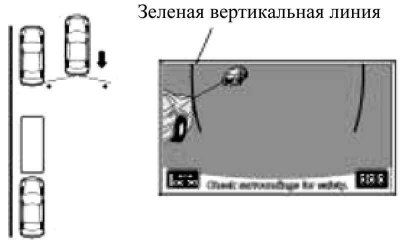
Pic. 1.25. Green outline displayed after reverse gear is engaged
Back up straight and stop when the green vertical line of the intended parking spot aligns with the rear edge of the parked vehicle.
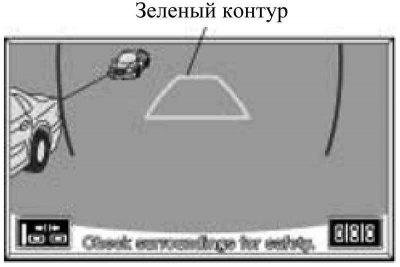
Pic. 1.26. Changing the position of the green outline
The green outline will be displayed 3 seconds after the reverse gear is engaged or if the steering wheel is turned while the vehicle is stationary (pic. 1.26).
Continue to turn the steering wheel, while shifting the green contour in the direction of the proposed parking place, until the contour takes the form shown in Figure 1.26. Continue turning the steering wheel until the green outline is aligned with the intended parking location. At this time, if the steering wheel is turned more than 90 degrees, the green vertical line opposite the intended parking location will disappear.
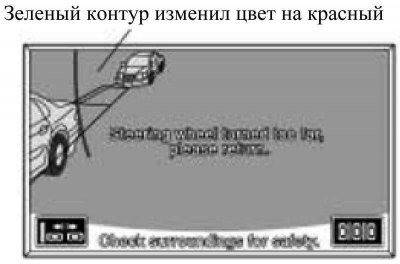
Pic. 1.27. Message about changing the green outline to red
However, if the steering wheel is turned too far, the message shown in Figure 1.27 will be displayed and the green outline will change to red, indicating that no further assistance is possible. Also, if the car is too far from the sides of another car, the same situation will occur even if the green outline is set to the normal position.
Hold the steering wheel in this position and start reversing. Then the green vertical line and the green outline will disappear and a parking line will be drawn in the direction of the proposed parking spot.
Hold the steering wheel in this position and continue driving in reverse. Stop when the parking line touches the left edge of the intended parking area.
With the vehicle stopped, turn the steering wheel fully in the opposite direction. After that, the same line will be displayed as in the passive assistance mode.
Using the distance line, back up slowly until the vehicle is parallel to the edge of the road or the curb, keeping an eye on the vehicles in front and behind. The parking maneuver will be completed when the vehicle is in parallel.
Maintenance recommendation
If you disconnect the battery terminal, the assistance function will not work properly. This is because the actual steering neutral point detected by the steering angle sensor does not match the neutral point recorded in the camcorder ECU.
Therefore, if the camcorder's ECU determines that the battery terminal has been disconnected, and after the terminal is connected, the system is turned on again, a message will be displayed at the bottom of the screen «System initializing» («System initialization»). In this case, you must perform one of the actions listed below.
- Turning on the IG-ON·mode with the car stopped, turn the steering wheel all the way to the right, then all the way to the left (You can start either by turning to the left or by turning to the right).
- Travel by car for about 5 minutes along the road with a minimum number of turns.
Function initialization after component replacement
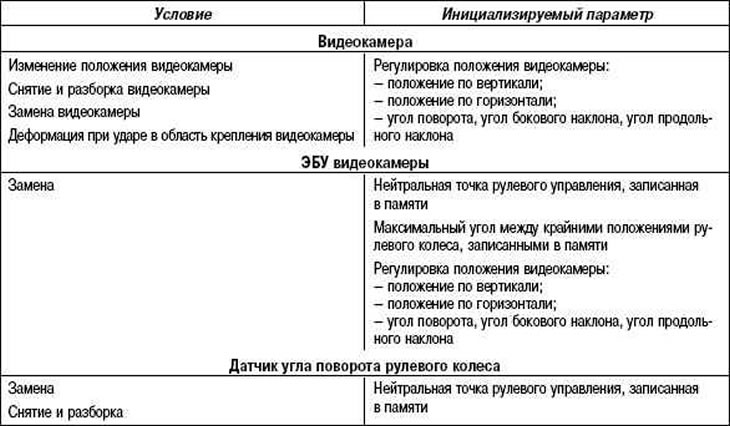
Initialization must be performed in any of the cases listed in Table 1.11.
The described initialization function is carried out via the diagnostics menu.
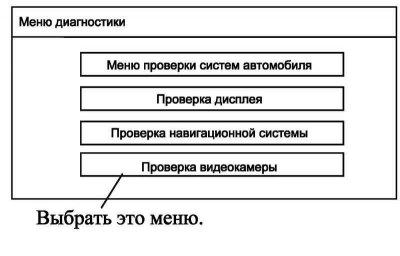
Pic. 1.28. Function initialization window after replacing components
The way to start the diagnostic procedure window is the same as for the navigation system (pic. 1.28).
Table 1.11. Cases of function initialization after component replacement
Emergency operation
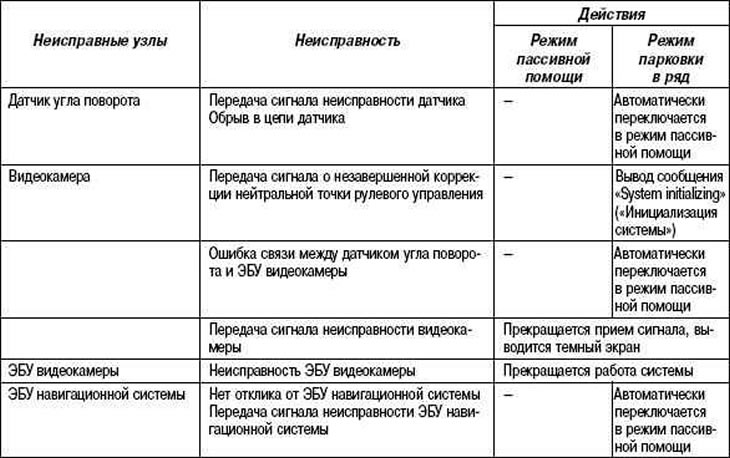
Table 1.12 lists the conditions for detecting faults in the sensors and ECUs of this system.
Table 1.12. Emergency operation
Self-diagnosis
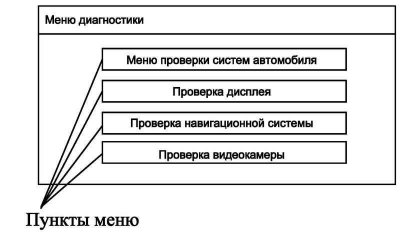
Pic. 1.29. Self-diagnosis menu window
The rear view monitor system is equipped with a self-diagnosis system and provides a diagnostic menu as shown on the right. The diagnostic menu contains three items (pic. 1.29).
Menu for checking vehicle systems.
Display test.
Checking the video camera.
The way to start the diagnostic procedure is the same as for the navigation system.
System Precautions
The camcorder uses a wide-angle lens. The distances to objects perceived by the screen differ from the actual distances.
In some cases, it may be difficult to see the image on the screen, but this is not a malfunction.
- In the dark (e.g. at night).
- When the temperature around the lens is too high or too cold.
- When the lens is exposed to drops of water or in high humidity (e.g. during rain).
- When foreign objects stick to the lens (like dirt).
- When the lens is directly exposed to sunlight or headlights.
If a bright light enters the camera lens (e.g. sunlight reflected off the body of a car), you may experience the blurring effect that is common with CCD cameras.
Blur effect
A phenomenon that occurs when bright light enters the lens of a video camera. The light source in the image looks like it has a vertical stripe above and below it.
