Removal and installation
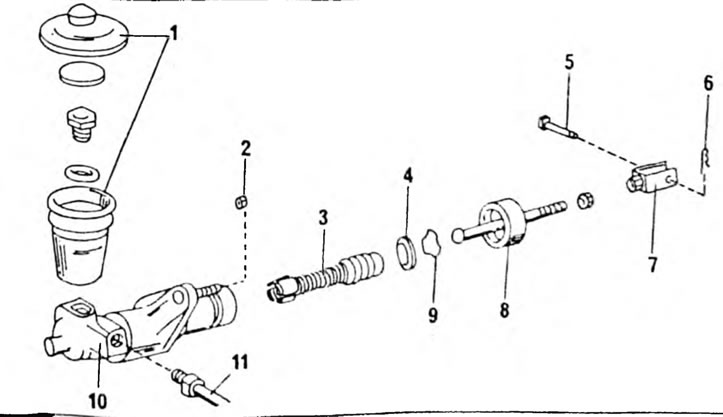
Figure 165 shows the master cylinder wiring diagram. When removing, disassembling, assembling and installing, using this figure as a guide, proceed as follows:

Pic. 165. Clutch master cylinder installation drawing: 1. Compensation tank; 2. Fastening nut; 3. Piston; 4. Pusher rod; 5. Cotter pin; 6. Spring bracket; 7. The head curled; 8. Rubber cap; 9. Retaining ring; 10. Drive cylinder body; 11. Clutch tube
- Remove liquid from the expansion tank. Suction is best suited for this, which, for example, is used to control the electrolyte in the battery (after it is contaminated with brake fluid, it must, of course, be cleaned).
- Unscrew the hydraulic pipe (11) on the side of the cylinder. Wipe off any leaking liquid with a cloth. Carefully bend the tube to the side.
- On a diesel engine, remove the lower dashboard trim. On all models, remove the air hose under the dashboard.
- Disconnect the clutch pedal return spring and remove the cotter pin (5) between the clutch pedal and the fork head of the master cylinder pusher rod (7), after removing the parenthesis (6).
- Unscrew the cylinder nut from the front wall (2).
- Carefully lift the cylinder without allowing brake fluid to spill onto the painted areas of the car. It is best to keep a rag under the cylinder. Wrap the end of the tube with adhesive tape to prevent dirt from getting inside.
- Install the cylinder in the reverse order. Tighten the cylinder nuts to a torque of 20-30 Nm. To secure the cotter pin, install a new spring bracket. The clutch hydraulic system must be bled (Chapter 8.7).
Dismantling and assembling the clutch master cylinder
Using Figure 165:
- Remove the boot from the cylinder and clamp the cylinder vertically in a vice, using metal spacers.
- Press the piston inward by the pusher rod and remove the retaining ring (9) from the hole. Remove the washer and pull out the push rod.
- Remove the complete piston from the hole. If necessary, use compressed air. But at the same time, wrap the end of the cylinder with a rag.
- If necessary, unscrew the expansion tank from the cylinder. To do this, unscrew the plug from the inside of the tank. There is an O-ring under the plug. Wash all parts with brake fluid or alcohol. Measure the outer diameter of the piston and the inner diameter of the bore. If the size difference exceeds 0.15 mm, a new cylinder must be installed. Remove the cuffs from the piston and place new cuffs on the piston, well lubricated with brake fluid. Assembly is carried out in reverse order. When installing the retaining ring into the bore of the cylinder, insert the pusher rod with the cuff on into the piston and push the piston inside. Hold the piston in this position and insert the circlip into the groove using circlip pliers and a screwdriver. After this, put the cuff on the cylinder body.
